Friday, 13 July 2018

3 Ways to Fix iTunes Songs Greyed out [Fast]


Possible Reasons behind iTunes Songs Greyed out

Since many people had this sync problem are using iTunes 12.2, it is most likely of problem of iTunes itself. There are also some others reasons for this problem. Apple Music is reported to delete songs downloaded from iTunes store, if they are available in Apple Music.
Besides, if the music file is missing or corrupted and the songs are listed in iTunes, these songs will be greyed out in iTunes. Based on your situation, you can try one or more of the methods below to fix this problem.

Solution 1: Re-login to iTunes and Try It Again

When you had this problem iTunes songs greyed out, the first thing you should try is to re-login to iTunes to see if it works. You can follow the steps below to re-sign-in.
Step 1. Within iTunes, click Account and select Sign Out.
iTunes Songs Greyed out
Step 2. Exit iTunes by clicking the close button.
Step3. Launch iTunes again. Click on the For You tab and log in through Apple Music.
During these process, iTunes will fix the syncing problem by updating to your iCloud Music Library. When you see the syncing loop in the top right corner is finished, you should be able to play the all songs through iTunes on your PC or sync to your iPhone, iPad, or iPod Touch.

Solution 2: Check Selection

If you notice that the songs greyed out are the ones that are not checked, then you easily check them to fix this problem.
Step 1. Click Library in iTunes and select Songs to view all songs.
Step 2. Right click on the songs that are greyed out and select Check Selection. You can select multiple of them by using Ctrl + click.

Solution 3: Check iCloud Music Libary

If you find your Apple Music songs are greyed out or gone, follow the steps below to get them back.
Step 1. Click Edit and select Preferences.
Step 2. Under the General tab, check the box for iCloud Music Library.If you accidentally deleted or lost videos on iPhone, first please check on the Recently Deleted folder. Alternatively, you can use the professional tool Gihosoft iPhone Recovery to recover deleted iPhone videos from Camera Roll or some apps.

icloud-music.png
After that, you should be able to get all your music and playlists back.

5 Best Data Recovery Software Of 2018 For Free


5 Best Data Recovery Software Of 2018 For Free:
1. Recuva:


The fact that Recuva is on the top of the best data recovery software list, may not come as a surprise to the most of you. This data recovery tool has the ability to restore files from hard drives, DVD or CDs, memory cards, and external drives. There are tons of free file recovery software around but few of them come close to Recuva when it comes to hard drive and photo recovery actions. For those who don’t, Piriform’s Recuva recovery perform does its work by searching for unreferenced data. It’s known for getting back lost directory structure as well as renaming two files of the same name while performing the data recovery.


Some of the features that bring Recuva on top of the list of Best recovery software are:


Superior file recovery


Advanced deep scan mode


Secure overwrite feature that uses industry & military standard deletion techniques and,


Ability to recover files from damaged or newly formatted files


Easy User interface


Preview screen before final recovery


Free/Inexpensive data recovery software


Works both on FAT and NTFS systems


Supported Platforms: Recuva data recovery software for PC can be used on Windows 10, 8, 8.1, 7, Vista, XP, and older versions of Windows.
2. TestDisk:


A list of best data recovery software can hardly be termed as being complete without a mention of TestDisk recovery software. It’s an open source software that was created with an aim to get back lost partitions and fix non-booting disks. Packed with features and a file recovery system that can easily overshadow that of any other data recovery software, TestDisk has a lot to offer for both novices and experts. This free data recovery program tries to detect partitions and file entries on its own. The deeper scan for deleted/damaged partitions obviously need more time.


Here are some of the TestDisk’s features:


Allows users to recover/rebuild the boot sector


Fix or recover deleted partition table besides being able to reliably undelete files from FAT, exFAT, NTFS and ext2 file systems.


Available on all major platforms such as Microsoft Windows, Mac OS X etc and is in fact quite popular as it can be found on various Linux Live CD’s.


Being a command line tool, TestDisk hard drive recovery tool may not be suitable for some users for data recovery. If you’re a fan of GUI, I would recommend you to go with Recuva or Stellar for file recovery.


Supported Platforms: TestDisk can run on Windows 10, 8, 8.1, 7, Vista, XP, and older versions of Windows, Linux, BSD, macOS, and DOS.
3. Stellar Data Recovery


Living up to its name, Stellar Data Recovery performs a stellar job in recovering your data from your Windows PC and Mac. If you are regretting your decision of deleting recent files, Stellar Data Recovery tool is here to help you in an effective way. Stellar also has many other tools for home and business applications but here we’ll be focusing on software for photo, USB, and hard drive recovery. Let’s tell you the highlight feature of the program.


Risk-free program recovers data from different types of storage devices like memory cards, smartphones, USB drives, hard disks etc.


Using Stellar Data Recovery program is simple. Just download it, start the scan, and you are able to recover from the past data disasters.


Full of advanced features and fast drive file recovery


Suitable for beginners and non-technical users


In-app preview of files available before making the final recovery attempt; also called Try before Buy feature


Supported Platforms: Revuca recovery program can run on Windows 10, 8, 8.1, 7, Vista, XP, and, macOS.
4. Undelete 360:


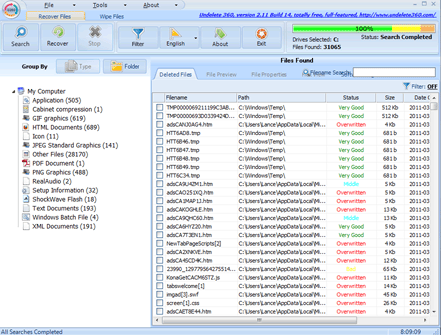
With the looks of a typical Microsoft Office application due to a ribbon-style toolbar and blue color theme, the Undelete 360 is built on a fast yet efficient algorithm which enables the user to undelete files. Here are some of the features of Undelete 360:


Works on a variety of devices such as Digital cameras, memory cards, smartphones, computer hard drives, USBs etc.


It includes a data-wiping tool, a Hex Viewer along with the ability to preview files before recovery.


Does a great job in recovering recently deleted files as compared to other free data recovery software


Also able to recover files of a wide variety of types such as DOC, HTML, AVI, MP3, JPEG, JPG, PNG, GIF, etc.


However, scanning speed needs major improvement and this tool also lags out its competition in terms of recovering data. The small setup size of the tool turns out to be a plus point in this race of file recovery software.


Supported Platforms: Undelete 360 can run on Windows 8, 8.1, 7, Vista, XP, and older versions of Windows.
5. PhotoRec:


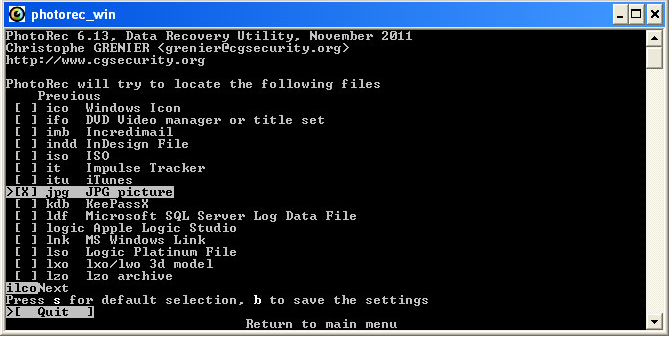
Definitely one of the best data recovery software out there, PhotoRec is widely acclaimed for its powerful file recovery over a wide variety of devices ranging from digital cameras to hard disks. It’s specially created to recover data like pictures, videos, documents, etc., from hard disks, CD-ROMs. Here are some of the features of PhotoRec recovery tool:


Compatible with almost all major platforms such as Microsoft Windows, Linux, Mac OS X etc.


Comes packed with the ability to recover more than 440 different file formats.


Features such as the ‘unformat function’ and the ability to add your own custom file types do come in handy.


This photo recovery software supports lots of file systems, including FAT, NTFS, exFAT, ext2/ext3/ext4 and HFS+.


Although I wouldn’t advise this free data recovery software to beginners as it is completely devoid of a GUI and uses a command line interface which may intimidate some users.If you accidentally deleted or lost videos on iPhone, first please check on the Recently Deleted folder. Alternatively, you can use the professional tool Gihosoft iPhone Recovery to recover deleted iPhone videos from Camera Roll or some apps.


Supported Platforms: PhotoRec recovery program can run on Windows 10, 8, 8.1, 7, Vista, XP, & older versions of Windows, Linux, BSD, DOS, macOS.

How to use iOS 12 built-in QR code scanner?

How to use iOS 12 built-in QR code scanner?


Follow the process mentioned below to scan QR codes in iOS 12 on iPhone and iPad.


Step 1: Launch the Settings app on your phone, and head to the Control Center.


Step 2: Now you need to go open Customize Control option. Then add the Scan QR Code Option in the Control Center menu.Read Next:movie4k


Step 3: Now the QR Code Scanner will be available in your Control Center. Open it and click on the QR Code Scanner button.


Step 4: Now the camera of your iPhone or iPad will be launched from which you can scan the QR codes of different products.


Step 5: After scanning the codes, your device will show a notification from which you can get all the information of the scanned code.


If you accidentally deleted or lost videos on iPhone, first please check on the Recently Deleted folder. Alternatively, you can use the professional tool Gihosoft iPhone Recovery to recover deleted iPhone videos from Camera Roll or some apps.

How to Factory Reset iPhone 7 2018 Guide

How to Factory Reset iPhone 7 2018 Guide

Remember: this removes EVERYTHING from your phone and resets it back to factory settings. If you’re sure you wish to proceed with this, follow the simple steps below. If you just want to reset a frozen device, hold “Volume Down” and “Power” for 15 seconds. That should reboot it.
Reset From Device


Click on “Settings” and then on “General.”


Scroll to the bottom of the General tab and click “Reset.”


Tap “Erase all Content and Settings.”


Enter your passcode (if you have set one) and confirm your reset by tapping “Erase iPhone.”


Your device should give you an estimate as to how long this process will take. Depending on how many apps you have, it could be anywhere from a few moments to an hour or more. During this time, the device is completely inoperable. Once finished, your phone will be like new. This is something you should do if you ever give or sell your phone to someone else as it erases all of your information.
Reset From iTunes


You may wish to simply restore using a backup of your device so that you can keep your settings, email and apps. This process involves a few more steps, but it’s still fairly simple.


Connect your iPhone to your computer with its cable and allow iTunes to launch. You’ll see a button appear for your phone under “Devices” on the upper-left side of your screen. This lets you know the phone is properly connected and recognized. Select the button.


If iTunes is set to automatically sync when the device is connected, it will start transferring data right away. This is a very important step so that all newly-added content will be saved, including any songs or apps you’ve purchased and photos you’ve saved. If iTunes does not automatically begin to sync, do so manually now. Press the “Sync” button at the bottom-right corner of the “Summary” option located in the left pane in iTunes.


Once the sync has completed, head back to the information page within iTunes. In the middle of the main window, you’ll see two buttons. Click on the “Restore” button. Once you have done so, iTunes will warn you that restoring your iPhone to factory settings will erase all media and data. If you’ve already successfully synced, simply click the “Restore” button again to begin the process.


As soon as you click the “Restore” button the second time, iTunes will automatically start the process. You’ll see several different message on the screen where iTunes tells you things – such as that it is extracting the software needed to restore your device. You’ll see things such as a message that it’s being verified with Apple, as well. Do NOT disconnect your phone from your computer while this process is going.


iTunes will tell you when the phone is finished being restored, but you aren’t done quite yet! You have to restore your settings and sync everything back to the device. Let the iPhone restart itself after restoration. You may then see a message saying it needs to activate – just wait a moment and it will then tell you that process is finished.


On the iTunes screen, you’ll see two options: “Set Up as a New iPhone” or “Restore From a Backup“. If you wish to restore your settings, email, contacts and other information, you’ll of course choose the “Restore From a Backup” option. Select the name of your iPhone from the drop-down menu on the right side of the screen.Once you click the button, iTunes will restore all settings and files you backed up earlier in this process. It will likely take several minutes – make sure you don’t disconnect the phone during this time. As soon as everything is restored to the iPhone it will restart itself once again. If iTunes is not set to automatically sync, please do so again now manually. This step is critical: it is when all of your files, apps, music and such will be transferred back to the iPhone.If you accidentally deleted or lost videos on iPhone, first please check on the Recently Deleted folder. Alternatively, you can use the professional tool Gihosoft iPhone Recovery to recover deleted iPhone videos from Camera Roll or some apps.


Thursday, 5 July 2018

How to save any audio file to iPhone without a Mac 2018 guide


How to upload you own files to Overcast


Overcast is a fantastic podcast player, not least because it strips out the pauses in people’s speech, making podcasts much less frustrating to listen to. The app is free to download, but if you want to upload your own audio files, you’ll have to pay a $10-per-year subscription (this also unlocks several other features).


Once you have done so, you can upload your own files to Overcast, via its website. This is easy.Read Next:movie4k


Step 1. Activate the paid subscription in the Overcast app on your iPhone or iPad.


Activate your Overcast premium subscription in the iOS app.


You’ll need to create an Overcast account in order to sign in to the Overcast web app. This is also found in Overcast’s settings, as seen in this screenshot:
Overcast defaults to no account, so create one here.Overcast defaults to no account, so create one here.
Give it a username and password, and then you’re off! You’re now ready to upload a file.
Step 3. Upload any audio file.
Once you have an active subscription, and are signed into your account at Overcast.fm, just head to overcast.fm/uploads, and you’ll see a familiar web form for uploading files. You’ll actually need to have some files to upload, which is outside the scope of this how-to. IT’s easy, though — when you download an audio file from Mobile Safari, you just save it in a folder somewhere in your Files app and go from there. And you can, of course, upload files from your Mac.
Step 4. Listen and enjoy!
Your uploaded files appear in a special section of Overcast, ready to be downloaded or streamed just like any other podcast. This is a great way to add the odd file to your iPhone for listening.

Roll your own podcast with Zapier

Long-time readers will be familiar with If This Then That, or IFTT, a great service that connects other web services to each other, enabling automation. Zapier is like a pro version of IFTTT, with a lot more control, better features, and far, far less home-automation crap.
For today’s how-to, we’re going to use Zapier to turn a folder of audio files in your Dropbox into a podcast RSS feed. This is super-simple, because Zapier already has an action set up to do it. All you need to do is sign up for an account (it’s free to join, with limitations), and point it at your own Dropbox.
zapper dropbox rssPoint the Zapier action at the correct folder on your Dropbox, and make sure it’s set to “include file contents.”
Photo: Cult of Mac

First, sign up at Zapier, if you haven’t already. Then, create a new folder in your Dropbox. Let’s call it Podcasts. Next, head to Zapier and add this action: Get an RSS Feed of All New Files in Your Dropbox. If you haven’t already connected your Dropbox to Zapier, you’ll be prompted to do so.
Then, you just follow along with the step-by-step setup process. It looks complicated, but you don’t really have to do very much to the default settings. You’ll need to pick the Podcasts folder in your Dropbox, then hit Continue.

Roll your own podcast feed

You’ll see this screen, which looks like a nightmare, but you don’t ned to do much at all. Pretty much everything is filled in already. Just make sure to copy the Feed URL at the top of the page (you’ll add this to your podcast app later), and
Don't panic.Don’t panic.

The one change I made was in the Media URL section, where you can “Specify a raw download URL for your podcast file, image, or other media file.” I clicked the dropdown arrow next to the box, and picked the Direct Media Link, as seen here:
This setting may be optional.This setting may be optional.
Photo: Cult of Mac
This makes sure (I think) that the RSS feed contains the raw audio file, so that Overcast (or any other podcast app) can use it. Then, click Done and Finish, and make sure to switch your “Zap” on.
Dropbox isn’t really meant for hosting podcasts, and if you host a popular public podcast this way, then you’ll soon get shut down or cut off. But for personal use its ideal. And if you are a teacher, say, then you could also use this method to share files with your class.

Add your new feed to your podcast app

Paste your RSS link in to subscribe to your own personal podcast.Paste your RSS link in to subscribe to your own personal podcast.


Photo: Cult of Mac


Remember the RSS feed address you copied at the beginning of the last section? Just open up your favorite podcast-listening app, and add a podcast in the usual way. There will be an option somewhere to add a new podcast by URL. Tap that, paste your link in, and tap save, or add, or whatever it tells you to do.


Now, whenever you add an audio file to the Podcasts folder in your Dropbox, it will show up as a podcast, and be automatically downloaded to your iPhone. Pretty cool, right? All you have to do is copy those audio files to your Dropbox.
The third way — HufferDuffer

HufferDuffer is kind of like Instapaper for audio files found on the web. All you do is sign up for a free account, then drag a bookmarklet to Safari’s bookmarks bar. You’ll be given a podcast feed, which you can add to the player of your choice with one click.Do you like this story?
Sponsor Ads:
Gihosoft Free iPhone Data Recovery is a professional iPhone Data Recovery software to get back all your lost text message, photo, video, call history, note, contact and more from iPhone/iPad/iPod Touch. It offers a full solution to recover your lost data in different tough situations. Besides recovering data directly from iPhone, iPad and iPod touch, it also allows you to recover data from iCloud and iTunes backup files.

Then, whenever you find some audio on the web that you want to save, just tap the bookmarklet, and the audio will be added to your podcast feed, and will end up in your podcast listening app.
This is clearly the easiest way too save audio files you find already on the internet, but doesn’t let you add any old audio file you like. I’ve settled on a double-team effort, using HufferDuffer and the Zapier-Dropbox methods together. And because it’s all podcasts in the end, it all shows up in the same app for me to listen.

Spotify Now Has 108M Paid Subscribers Compared to Apple Music’s 60M

Spotify today announced its Q2 2019 earnings where it revealed that it now has 108 million paid subscribers. That’s an increase of 8 million...